


Why do so many corporate grocery stores feel the same?
Simply put, they’re all playing from the same product placement playbook.
While there are widely regarded best practices for overall product placement in grocery stores, many big chains are limited in what they can do thanks to slotting fees and other paid shelf placements.
Small grocery stores, on the other hand, are free to arrange products however they want. Optimizing where the various products live in your grocery store is a great way to improve the shopping experience and to stand out from the competition.
In this blog, we’ll give you an overview of general best practices for product placement, along with eight tips you can use to boost sales and improve the customer experience at your store.
Product Placement Best Practices for Small Grocery
As mentioned, one reason big chains have such strict product placement rules is that there’s a lot of money tied up in slotting fees and other paid arrangements.
While independent grocers might make similar deals on a smaller scale, you generally have much more freedom when it comes to product placement — which means you can truly cater the layout of your store to customers’ needs.
That said, here are a few general rules to follow when deciding where to place your items:
- Put produce and baked goods near the front of the store to create an atmosphere of freshness from the moment a customer walks in.
- Generally speaking, place any bestselling items at or around eye-level. (We go into more detail on this below.)
- Try to be consistent about where certain products are located in the store, but leave space for seasonal or promotional displays.
- Always find opportunities to cross-sell items that are frequently bought together, whether it’s wine and cheese, chips and dip, or pasta and sauce.
- Understand what your most popular items are, and place them in a way that helps “guide” the customer through your store.
This isn’t a definitive list, but it should give you a general idea of what to think about when deciding where to place your stock.

8 Winning Tips for Grocery Store Product Placement
Product placement is an essential part of grocery store design — so much so that corporations and governments have pumped millions of dollars into studying the effects of different product placements on customer behavior.
The good news? You don’t need to hire an expert or spend tons of money to improve the product placement in your store. In truth, there’s no single, perfect strategy for product placement in grocery stores (especially for small grocers) because every community and store is a little different.
But by following these best practices and tips, we hope you become more confident in your product placement decisions and get inspired with creative ideas to use in your store.
1. Use Sales Data To Adjust Shelf Layout
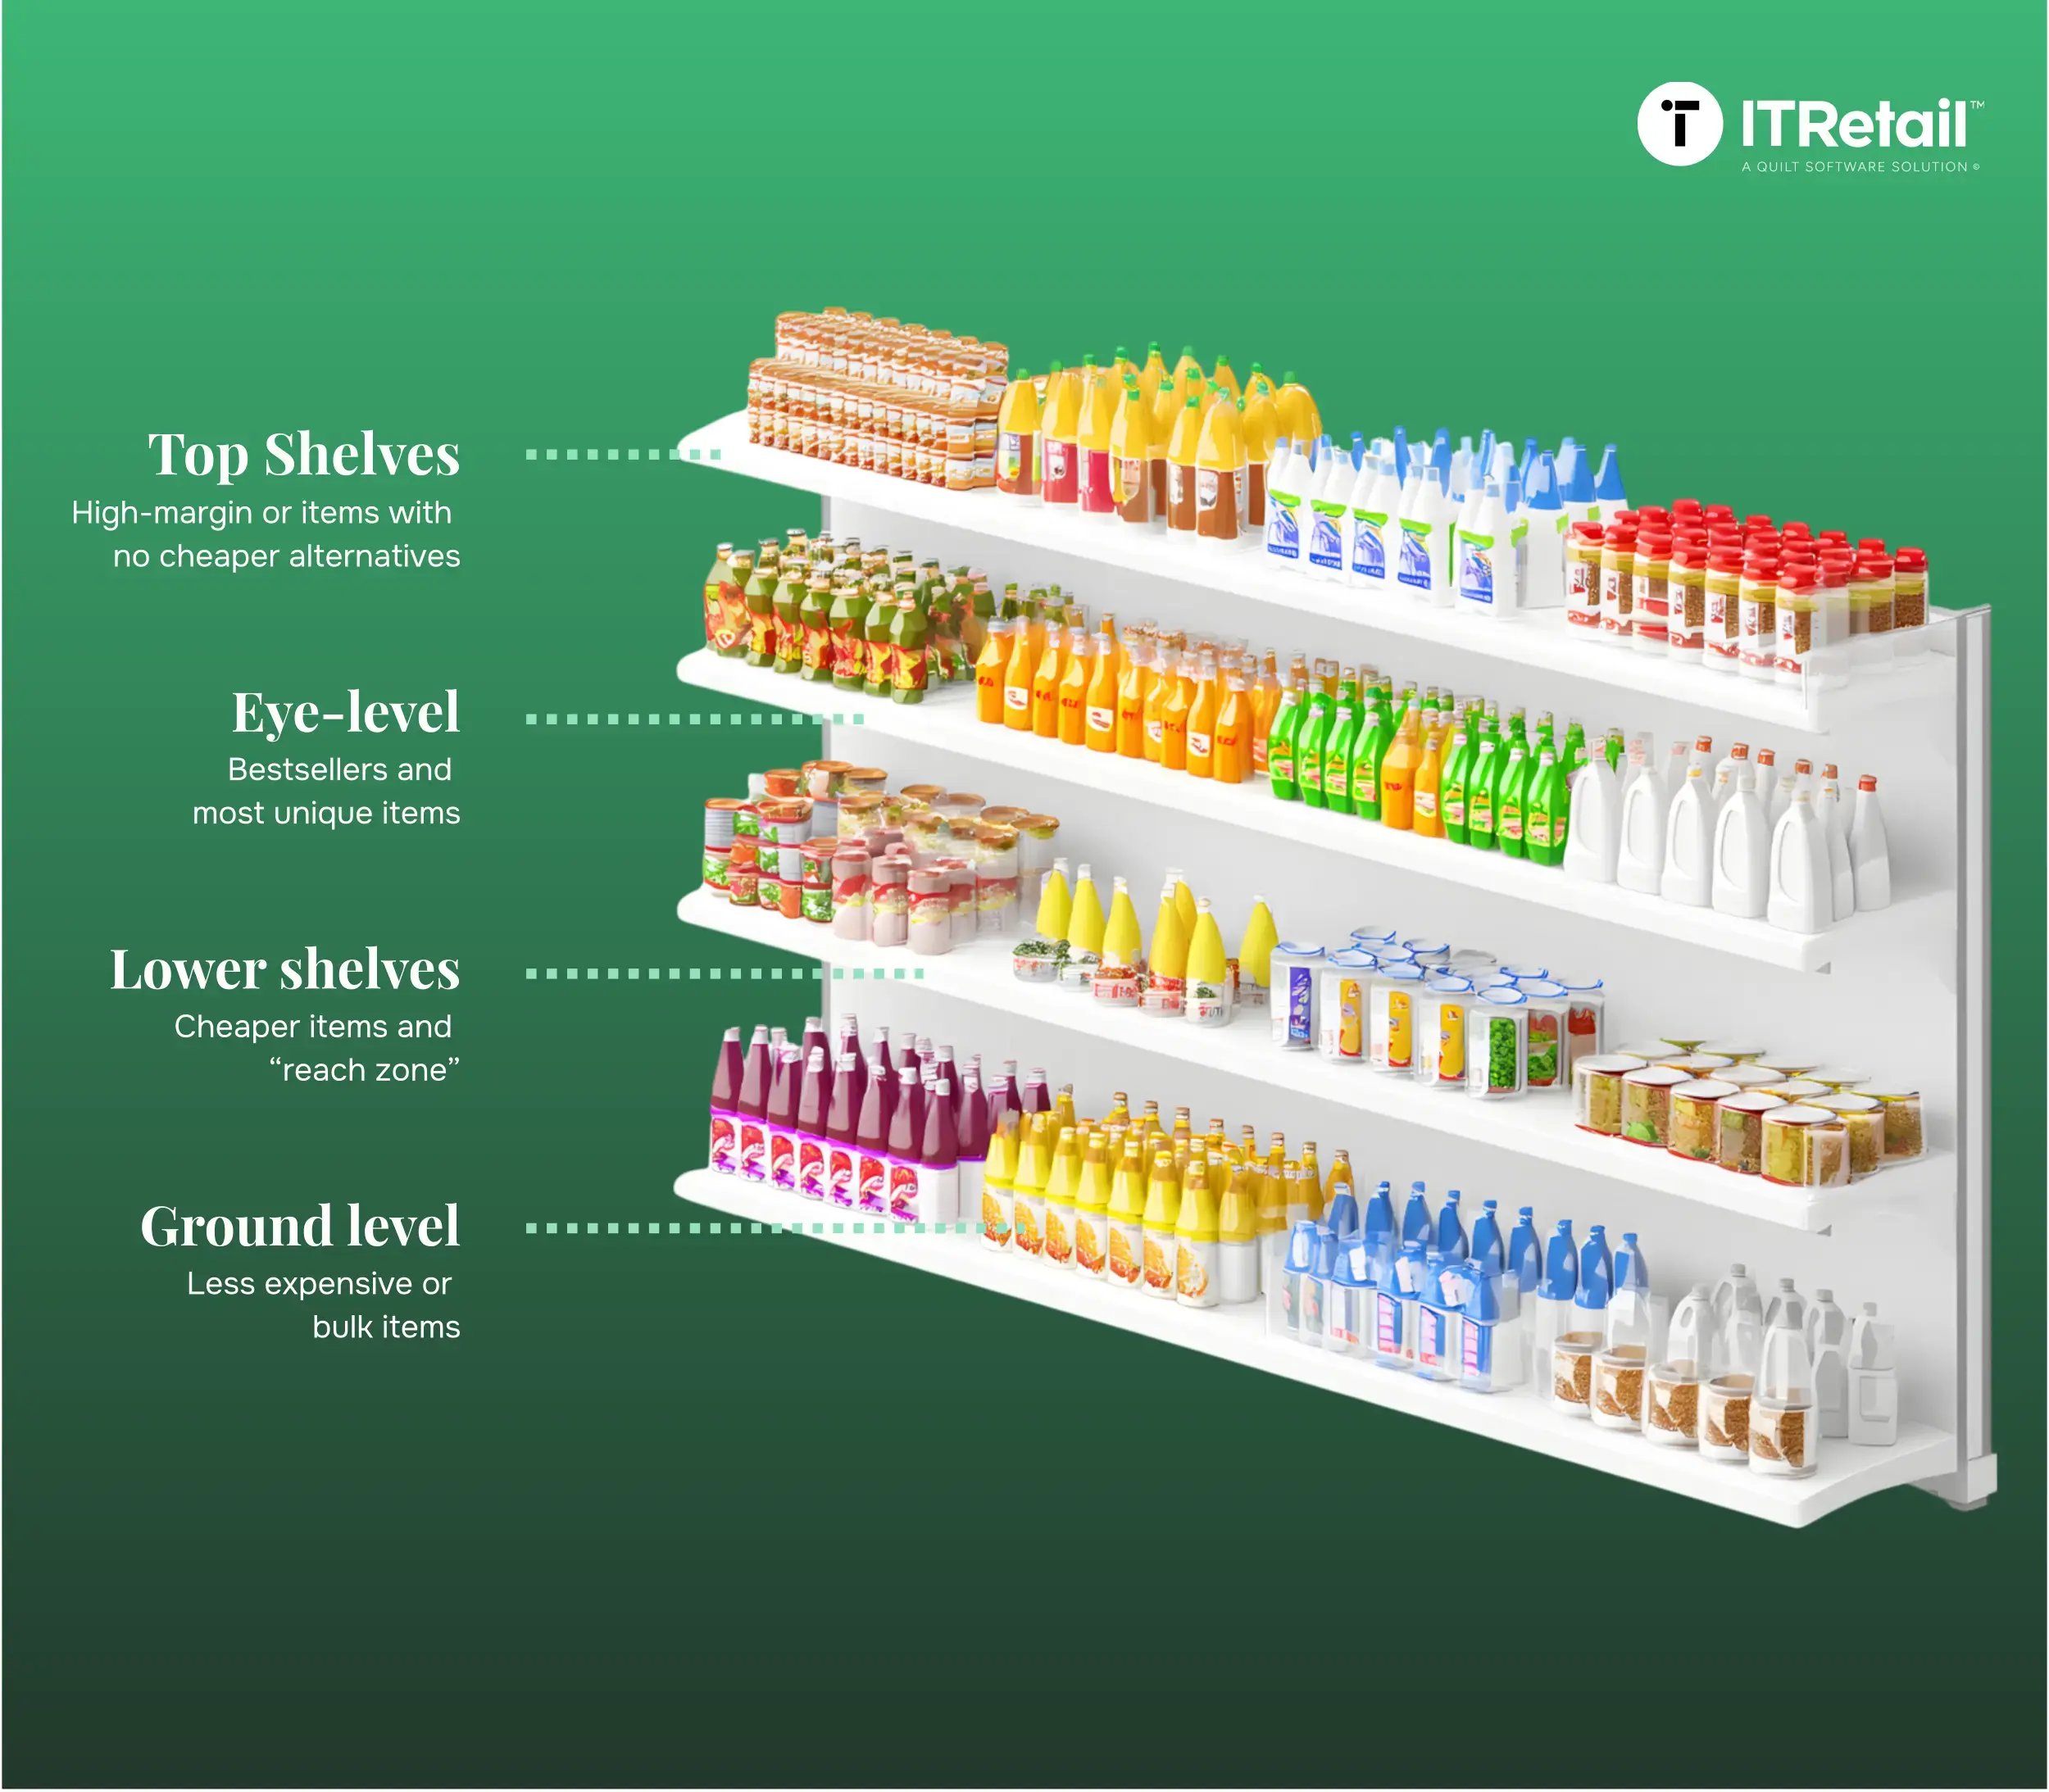
The most valuable real estate on an average grocery store shelf is at eye-level. Customers easily notice items that sit at eye-level — which means this has a major impact on how they perceive the overall quality and selection of your stock.
But what products deserve this coveted space? Generally, you want to put your bestselling, most popular items here. Use the reporting data on your point of sale (POS) system to find what your bestselling items are in each department — this is your starting point.
However, item placement isn’t just a one-and-done activity. Review your sales data periodically, especially after introducing new products, to see if it’s worth making adjustments.
Of course, just because an item isn’t at eye-level doesn’t mean it’s not important. Here are some general tips for arranging your shelf:
- Ground level: Customers generally understand that less-expensive alternatives to name-brand items are found on ground-level or lower shelves.
- Lower shelves: This area is ideal for more low-budget items and is also in the “reach zone” for children, making it a good spot to put toys and candy (and also a place to avoid putting fragile bottles and jars).
- Eye-level: As the saying goes, “eye-level is buy-level.” Reserve this area (about 4 to 5 feet off the ground) for your bestselling and most unique items.
- Top shelves: Like a bar, some stores reserve the top shelf for their high-margin, top-end products, or items that don’t have cheaper alternatives. However, be sure they’re lightweight enough that customers are willing to reach for them.
It’s worth noting that every store is unique, and your customers may not respond to shelf placement in the “standard” way. That’s OK! You can do your own experiments, rearrange shelves, and then monitor the data on your POS system to see how it impacts sales.
Related Read: Mastering Grocery Store Analytics: 7 Ways To Use Your POS Data
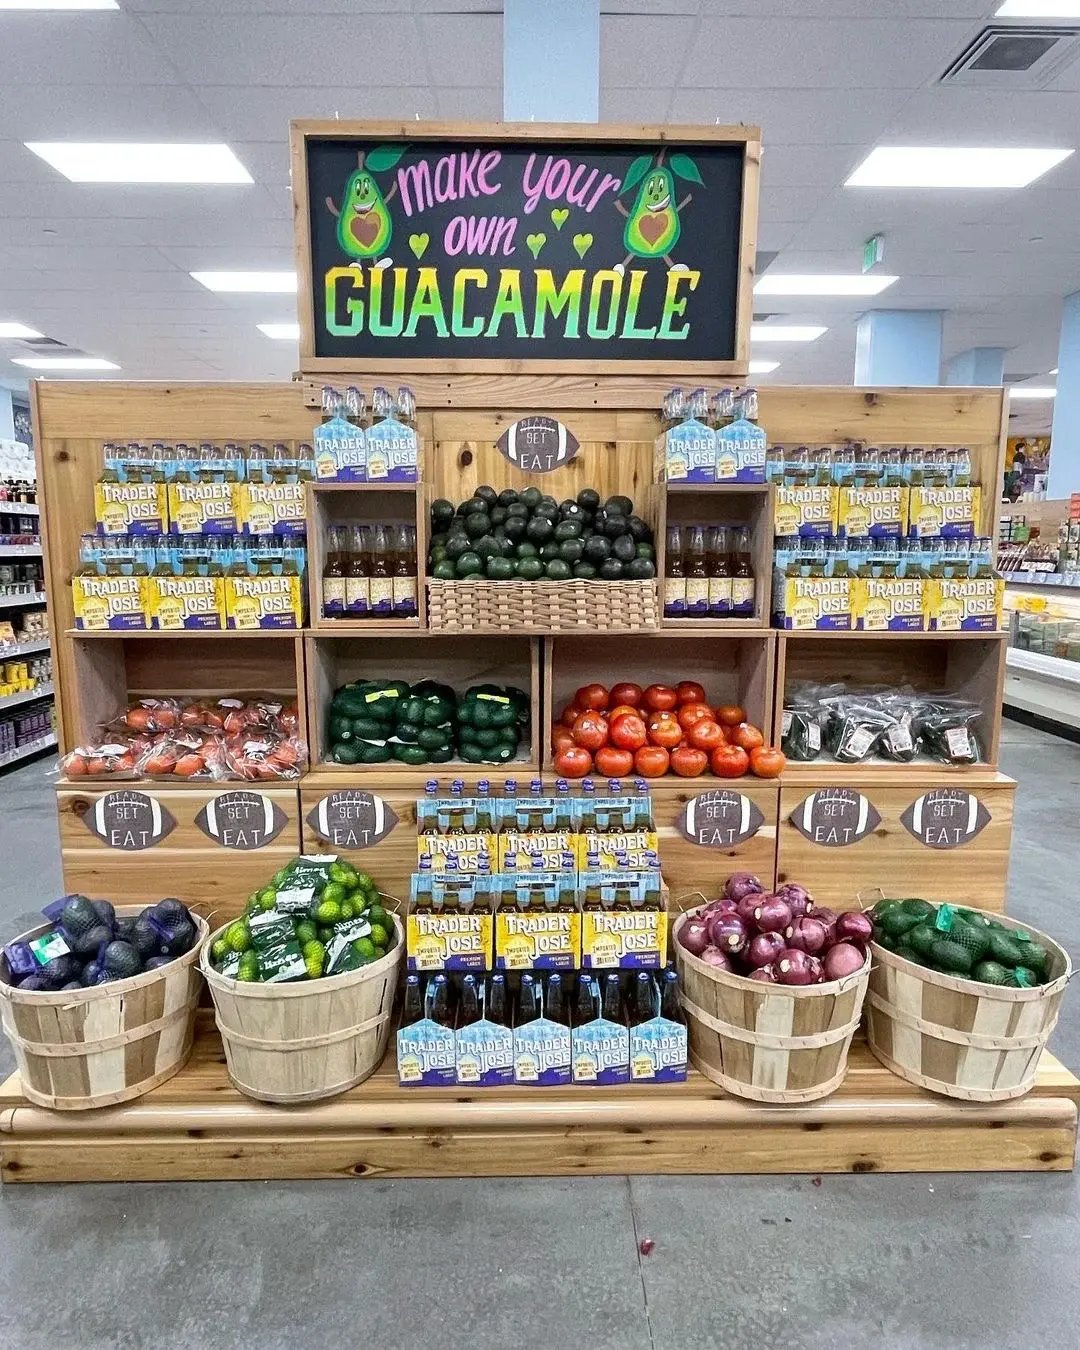
2. Fill Endcaps With Seasonal Displays and Trending Items
Another prominent spot for product placement in grocery stores is your endcaps. Endcaps are the standing displays or shelving at the end of an aisle, making them nearly impossible to miss — even if you don't actually go down the aisle.
(Image source: Launch Point Retail)
Endcaps are ideal for highlighting store promotions and a few other use cases, such as:
- Seasonal displays: Create a festive area where customers can find all of their favorite snacks during football season, get delicious house-made corn tortillas around Cinco de Mayo, or pick up sparkling wines for New Year’s Eve.
- Local brand highlights: Spotlight a local food supplier on an endcap, especially if it’s new or you don’t have space in the main aisle.
- Product bundles: Create unique product or recipe bundles like a fall soup-making kit, a guacamole-making set, buy one, get one (BOGO) deals on snacks, or mix and match deals with chips and dips.
- Discounted items: Create an area for rotating discounts on an endcap at the back of your store to sell popular but overstocked items, encouraging customers to check in periodically and see what’s on sale.
Unlike a corporate grocery chain, most small grocers aren’t limited in the specific products they can put on endcaps — so use your imagination! Decorative and creative endcaps are a fantastic way to differentiate yourself from the competition and show off your personality.
3. Organize Produce Displays To Increase Variety
Produce sections are almost always placed near the front of the store — and for good reason. The bright colors of fruits and vegetables create a welcoming atmosphere of quality and freshness.
But that first impression can sour quickly if your displays are too big or not varied enough.
It’s important to keep produce displays looking full — people don’t want to feel like they’re buying what’s left at the bottom of the barrel. But this can backfire if you’re constantly filling up a produce bin that’s so big that items go bad before they’re sold, or looks monochrome.

When arranging your produce section, be on the lookout for bins that are too big. This gives you an opportunity to add dividers, so you can consolidate items into a smaller area. This simple change makes produce sections pop with a mix of vibrant colors.
Ultimately, this can free up room to highlight seasonal or local produce, or for homemade salads, dips, and other fresh, ready-to-eat items.

4. Place Staples Around the Edges
Another general best practice for product placement in grocery stores is to carefully place staple items around the edges of the store. When most people shop at a grocery store, they look for a few regular items and pick up others on the way.
The longer you make the path between staples like eggs, milk, and bread, the more chances you have to tempt customers to buy more. In other words, you want to make sure people can’t go to one corner, get everything they need, and check out without seeing the other 80% of your store.
Your intuition likely gives you a solid idea of which items are your “staples,” but this is another area where sales reports help you identify the specific items people frequent your store for.
Instead of sorting items by transaction amount, look at overall sales volume. Most stores deliberately price these key value items (KVIs) lower to stay competitive, so they may not show up at the top of your sales numbers.
Once you create a KVI list, it’s easier to visualize the average customer’s path through your store.
Related Read: 10 Supermarket Pricing Strategies To Try Today
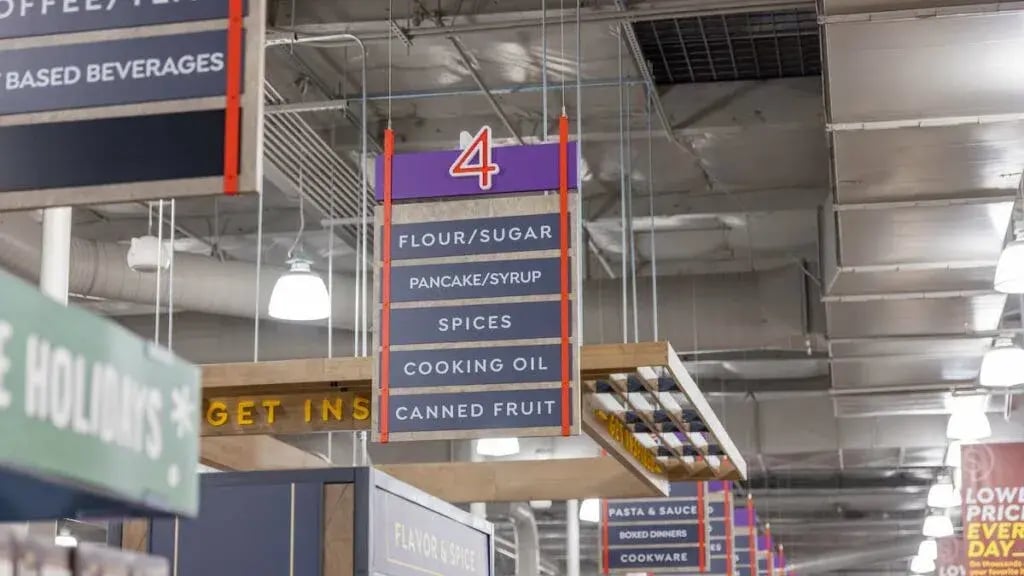
5. Base Wayfinding Signs on Sales Reports
To a certain extent, the “best” product placement in your store is determined by whether or not your customers can easily find what they’re looking for. Carefully considering your store layout is a good starting point — and helpful wayfinding signage makes the shopping experience even better.
(Image Source: King Retail Solutions)
Wayfinding signs are the signs typically placed above an aisle that list the general category (e.g. baking, Hispanic foods, condiments) and a few example items. They help shoppers quickly find what they’re looking for while encouraging them to browse.
But with such a limited space on each sign, what products do you list?
If you organize all of your items by department or shelf in your inventory management system, simply filter your sales reports by the area they’re located. There, you can quickly choose four to five items from each section to list on your wayfinding signs.
Having this information in your inventory system also makes it easy for staff to quickly look up where an item is placed straight from the register or even their smartphone.
Related Read: 6 Ways Supermarket Signage Improves the Shopping Experience
6. Use Small Floor Displays To Cross-Sell
Putting thought and intention behind your grocery store layout and product placement is important, but that doesn’t mean certain products should only appear in one part of the store.
Place standing floor displays at the front of the store or in certain departments to highlight short-term promotions or to cross-sell items from another section. Showcasing different items is attention-grabbing and might tempt a customer to throw an extra item or two into their basket.
Here are a few examples of how you can use floor displays in your store:
- Create a standing display of your top-selling salsas to put in your chip aisle.
- Put a wire rack with whole spices next to your red wines for making holiday mulled wine.
- Place some bread from your bakery in your produce section, along with hummus, cucumbers, and other fresh veggies for healthy snack options.
A great standing display inspires people to try something new, enjoy some in-season produce, or nudge them to indulge in that snack they might have otherwise passed by on the shelf. Don’t be afraid to get creative!
7. Take Chances To Highlight Unique and Local Offerings
While we do believe it’s important to place your bestsellers and high-margin items in prominent positions, there is a risk of playing it too safe. Thanks to slotting fees and brand deals, the prime real estate at big-box stores is increasingly dominated by similar products and identical displays. In other words, you don’t want your aisles to look the same as everyone else's.
So, in addition to putting some safe and trending items at eye-level, reserve space for unique products or items from local suppliers that customers can’t easily find at other grocery stores. This helps emphasize what makes you different, while positioning your unique products alongside popular, recognizable staples.
You can further draw people’s eyes using colorful shelf-edge signage. For example, you can have signs that feature the state flag for locally-made products or bright stickers for new arrivals.

8. Alternate Colors, When Possible
Companies spend a ton of time on packaging. It’s for good reason — people’s eyes are naturally drawn to contrasts in colors and shapes. You can use this to your advantage.
Well-organized but highly diverse bursts of color help create the impression of variety, and this is a good best practice to follow for all departments of your store. Here are some tips for different departments:
- Dry goods and snacks: Alternate different colors of packaging, while keeping brands or categories (e.g. tortilla chips, chicken noodle soups) together.
- Produce section: Create attractive contrasts using fruit and vegetables’ natural colors, while maintaining proper storage for freshness. Just be careful to avoid mixing fruits and vegetables that are prone to absorb surrounding odors (e.g. apples and pears).
- Meat section: Don’t mix different types of meat products (e.g. chicken and beef) to create color variety — instead, lean more into colorful shelf dividers and signage. This creates contrast and minimizes the risk of cross-contamination and confusing customers.
- Dairy: Use shelf-edge labels to help customers quickly spot differences in products that they care about most (e.g. organic, 2%, lactose-free, etc.)
Alternating the placement of products on shelves or using colorful signage isn’t all you can do to draw customers’ attention — you can also introduce standing displays as a flash of color to break up a monotonous-looking area.
For example, you can place a selection of spreads and dips near your bakery or stock a shelf full of fresh granola near the dairy section.
Make Confident Product Placement Decisions With IT Retail
With tariffs and inflation hitting small grocery store owners, finding ways to reduce costs and keep customers engaged is essential.
Optimizing your product placement is one way to do that, but it’s hard to get started without a clear, simple way to track every aspect of your business.
IT Retail was built by grocers like you to tackle the specific challenges of running an independent grocery store. Our solution makes it easy to monitor store performance, track a wide variety of inventory, and use detailed reports for better decision-making.
Schedule a personalized demo today to see what IT Retail can do for your small business.
![How Does the Supermarket Supply Chain Work? [+How Your Store Can Adapt]](https://www.itretail.com/hs-fs/hubfs/Blog%20Featured%20Images/IT%20Retail%20Blog/How%20Does%20the%20Supermarket%20Supply%20Chain%20Work%20-%20BLOG.webp?width=520&height=294&name=How%20Does%20the%20Supermarket%20Supply%20Chain%20Work%20-%20BLOG.webp)
 by Luke Henry


